Showing posts with label waterfalls. Show all posts

Tuesday, December 10, 2013

Shooting Moving Water Photograph


Rivers, waterfalls and gently babbling streams are soothing even in photographs. 
We are automatically drawn to the contrast of blue and white waters passing through brilliant green landscapes, gentle fields of yellowing grass, or tumbling through grey and green moss covered boulders and rocks. 
How do you capture water in motion?
waterfall
Beginners Photography - Photorealistic Images:

If you permit the automatic settings in your camera to record the moving water, chances are it will opt to utilize a fast shutter speed to eliminate blur.

While this gives an accurate depiction of the moving water, it may not create the tone or texture that is desired.


Beginners Photography - Smooth Water:

By adjusting camera settings manually the appearance of moving water can be made smooth and almost “soft”. This is done by choosing a slow shutter speed.

This may require reliance on a tripod to prevent hand shake and blurriness, but the result will be dramatically different than from an automatic settings. The slower the speed of the shutter the blurrier the passing water becomes giving it the softer and opaque appearance.


Beginners Photography - Basic Shutter Speeds :

For blurry water it is best to begin with one eighth second setting and work down from there, but true smooth water usually is not available until a shutter is open for a full second or more. Also the lower the ISO on the shot the more likely the image captured is going to be satisfactory.

This is where the smallest aperture and highest f/stop will result in the slowest possible shutter speed for the ISO and lighting conditions.


Beginners Photography - Remember Distance:

The distance between the camera and the image of water it is capturing changes the effect of shutter speed on the "blur" factor. The closer the camera is to the water the more quickly the blur is captured.

Low lighting may exist within many moving water environments and this too will necessitate slower shutter speeds and even tripods.


Beginners Photography - Rely on Shutter Priority settings:

experiment with a few shutter speed settings for moving water, and allow the shutter priority to determine the f-stop and aperture on the image.

Record which results you find the most appealing and visit other bodies of moving water to further experiment.


Beginners Photography - Don’t Limit Subjects:

remember that water flows to the sea shore in large waves and gentle lapping tides, it flows from lawn sprinklers and regularly spurts and erupts from public fountains, so experiment at many types of locations.

waterfall
Moving bodies of water never present the same image capture requirement which is why photographing moving water can be such a fun and highly experimental venture.

Many photographers return to the same locations throughout the year to record the variations in plant life, water levels and to learn about photographing in the changing light and seasons.

Digital Photography On Waterfalls


One of the most common questions that I’m asked is ‘how do I photograph waterfalls?’
Waterfalls-1
Waterfalls do present themselves as a wonderful and challenging subject matter to photographers. Firstly they’re beautiful places, secondly they are often in tricky lighting situation and thirdly they’re a dynamic subject as they’re moving (and of course movement means a challenge but also a real opportunity for a more dynamic shot).
A lot has been written about the finer points of photographing waterfalls but the basics are fairly simple.

Working with Movement

Anytime you’re presented with a moving subject a photographer really has two options. Firstly they can freeze the motion by using a fast shutter speed and secondly they can capture and enhance the motion by using a longer shutter speed that blurs the moving element in the shot (in this case – water).
Most photographers take the second option and allow the water to blur. Here’s how to do it. You’ll need your digital camera and a tripod. It will also be helpful to have a polarizing filter if you have one.

How to Photograph Waterfalls


Waterfall-1

Take a Control Shot - Before you start experimenting – switch your camera to auto mode, make sure your flash is turned off and take a shot of the waterfall. As you do – take notice of the exposure that the camera sets. Your camera will almost certainly choose an exposure that freezes the water somewhat. This photo will be a bit of a reference point to compare your shots to later and to use as a basis for your exposures.
Shutter Priority Mode – Switch to shutter priority mode on your camera (we’ve talked about shutter and aperture priority modes previously). Generally you’ll want to try to get a shutter speed of 1 to 2 seconds to get a nicely blurred water.
Tripod – Of course to take a shot at a shutter speed of this length you’ll definitely need a tripod or some other way to ensure that your camera is completely still for the full time that the shutter is open.
Sounds easy doesn’t it – attach your camera to a tripod, switch to shutter priority mode, set your shutter speed to 1-2 seconds and take the shot. Unfortunately in most cases it’s not that simple.
The problem with increasing the shutter speed is that it increases the amount of light that gets into your camera and unless it’s quite a dark and gloomy day you’ll find your image is going to be over exposed (even though in shutter priority mode the camera will choose a very small aperture to try to compensate for it).

Other Tips to Try to Get Exposure Right


There are a couple of things that you can do to decrease the amount of light coming into your camera and get your exposure levels better:
Photographing-Waterfalls-1
Timing – pick the right time of the day to do your waterfall photography and you can definitely give yourself more options to use longer shutter speeds. Around sunrise and sunset are obvious times as light is less bright. Also overcast days are better than bright ones.
Filters – using a filter that cuts down the amount of light entering your camera can help also. There are a variety of filters available that do this but I generally use a polarizing filter as it not only cuts down the light getting in but also can help you improve your shots (they cut down on reflections in shots – and waterfalls can have quite a few of these). Another type of filter you might like to use is a neutral density filter which is a filter that cuts down the light entering your camera – almost like putting sunglasses on.
Aperture Priority Mode - if you are still having trouble with exposure even at darker times of the day and with the use of a polarizing filter another approach that you can take is switch into Aperture Priority Mode and choose the smallest aperture possible. On most cameras this will be f/22 or f/36. The result of choosing this is that your camera will automatically choose the longest shutter speed available for that aperture. It may not be 2 seconds – but it will almost always be longer than the shutter speed in that first control shot that you took and as a result the water will blur more than in the first shot. The other impact of having a smaller aperture is that you’ll have a larger depth of field and more of the waterfall will be in focus.
Low ISO – Choosing a lower ISO will mean that your camera’s sensor is less sensitive to light and will need the shutter to be open longer. It will also mean less ‘noisy’ or grainy shots which will give your shots lots of nice detail.

More Waterfall Photography Tips


Of course getting the exposure right is just part of the equation when it comes to photographing waterfalls with you digital camera. here are a few extra tips.
Waterfall-Photography-1

Bracket your Shots
The first time I ever did some waterfall photography was over a decade ago when I was using a film SLR. I spent a week away by myself purely for photography in an area where there are many waterfalls.
What I learned in that week was the importance of bracketing my shots – taking a series of shots at different shutter speeds and apertures. I found that in doing this that I could capture a variety of very different images of exactly the same scene with changes in the extent that the water blurred, changes in the depth of field and changes in the way the camera captured color.
Also use your cameras built in exposure bracketing (check your manual) and bracket your shots in this way also.
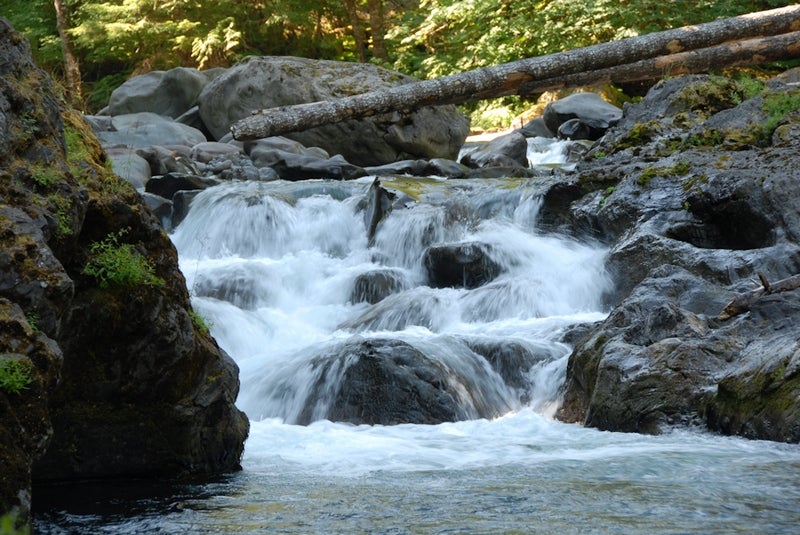
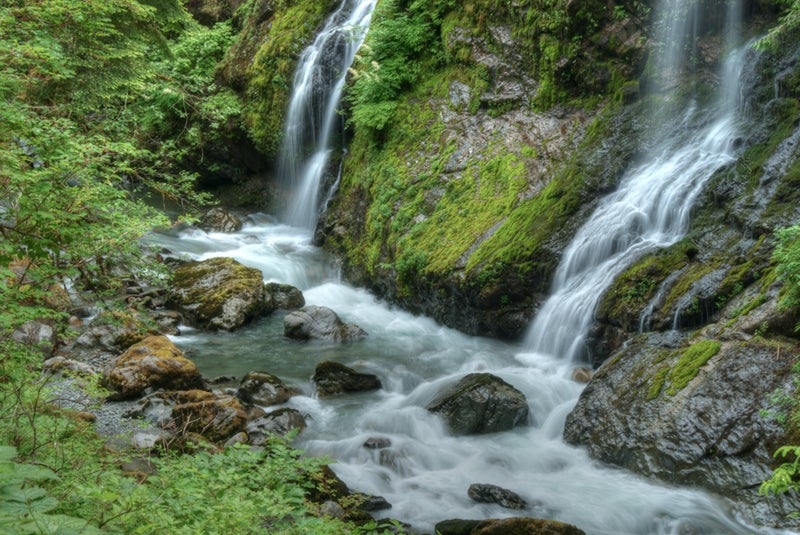
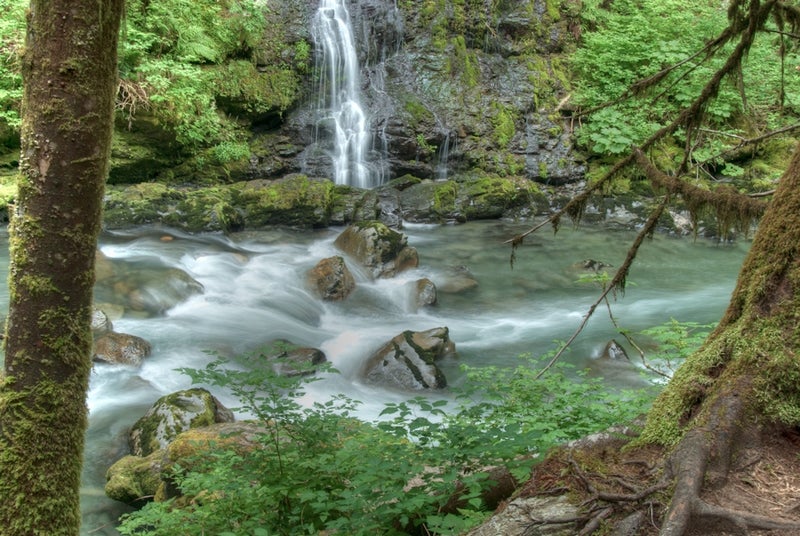
Composition
Also on my week of photographing waterfalls I learned that a waterfall could be photographed from many angles and in many different ways ranging from the wide angle shot that puts the waterfall into it’s wider context right down to tightly cropped shots that focus upon just one small part of the waterfall. Also look for the different ways the water flows. In some places it’ll be multiple streams, in others it will gush explosively everywhere and in others it will flow gently in a single stream. Try a variety of positions on the waterfall (you’ll find that it’ll flow at different speeds in different sections also) and experiment with how the different parts look at slow shutter speeds.

Waterfall-Digital-Photography-1
Tidy Up
While I’m a big believer in being an environmentally friendly photographer (and always leaving a location the way you found it) a little tidying up of your scene can have a big impact upon a waterfall scene). Before taking shots scan your eye over your frame and look to see if there are any distracting elements that might be able to be moved. Particularly look for litter but also consider leaves on rocks etc. Simply tidying up the image in a way that doesn’t do any physical damage to the location can take your images to the next level.
Don’t Become Obsessed with Blurred Water
The effect of silky smooth moving water in your shots is difficult to resist but don’t let it become the only type of waterfall image that you capture. Try taking some shots with ultra fast shutter speeds also. This can especially be a powerful technique on raging waterfalls where there is lots of spray and explosive splashes. The other impact of faster shutter speeds is that you’ll need to use larger apertures which means narrow depth of field which will bring a whole new impact to your shots.
Get out and Experiment
That’s enough theory – now it’s time to get out and do it because the more you do the better you’ll get. Have fun!

- Digital Photography School

Photograph Waterfalls and Moving Water


While I'm not a huge fan of camping or long, multi-day hiking trips, I do love visiting waterfalls. There's something about the rush of water that's both exciting and beautiful. It's one of my favorite photographic subjects. Taken with a slow shutter speed, water blurs into a deceptively tranquil image that effectively conveys the impression of motion in a still photograph--not entirely unlike shooting fireworks.
Since we're in the middle of vacation season, let's take a look at how to capture some exciting and attractive photos of water in motion, so you're all set to go when the time comes to grab your camera and hiking shoes.

It's All About the Shutter Speed

The most important rule for shooting waterfalls (and all sorts of moving water): Use a slow shutter speed. How slow? Anywhere from about a half second to 2 seconds will do nicely. If you use a very fast shutter speed, you will freeze the motion of the water, like the shot on the left.


The longer the shutter stays open, the blurrier things get. Here's what you can expect with about a second. As you can see, the longer the exposure, the blurrier and more abstract your scene becomes.

Preparing for the Shot

Since you need to shoot with a slow shutter speed, you should set your camera to its Shutter Priority or Aperture Priority mode and dial in an appropriate shutter setting. Be sure that your camera is set to the lowest possible ISO, since a higher ISO setting will make the camera more sensitive to light, and therefore shoot with relatively faster shutter speeds.
In addition, be sure to mount the camera on a tripod. You've probably noticed that I recommend tripods a lot, but this is one of those situations in which it's pretty much essential. Without one, your photo will be a blurry mess.

Taking the Shot

Since the shutter will be open for a while, even slight vibrations can blur the overall photo. When I shoot waterfalls, I use a remote trigger for my camera. A remote trigger can come in the form of a wireless remote or a cable that plugs into your camera, so you might want to check your camera's user guide to see if such an option is compatible with your model.


If you don't have a remote trigger, you can get a similar result just by using the camera's self-timer--turn on the timer, press the shutter release, and then step back so you don't touch the camera until the shot is completed, about 10 seconds later. (See the shot on the left.)

Avoiding Overexposure

Capturing those dreamy, blurry waterfalls and river rapids is pretty easy once you figure out the basics--stuff like using a tripod and a setting a slow shutter speed. You might notice, though, that some parts of your photos turn out somewhat overexposed. The problem is that the total range of exposures, from the bright, reflective water to the darker foliage and shadows, is greater than your camera is capable of capturing in a single shot.
One popular solution is to use a neutral density filter. A neutral density filter screws onto the front of your lens (if your lens has threads, as do most Digital SLR lenses, and some point-and-shoot cameras) and reduces the amount of light reaching your camera's sensor. That will help reduce or eliminate the worst of the overexposures.
Another option is to take a series of photos at different exposures and combine them afterwards using High Dynamic Range software. If your camera has a bracketing mode, it's easy to take a series of three or five photos at varying levels of under- and over-exposure. I explained how to create HDR photos in my two-part series, "Stunning Photos With High Dynamic Range, Part 1" and "Stunning Photos With High Dynamic Range, Part 2."


This is a fun technique to experiment with, and--if you have access to HDR software like Photomatix Pro--you can get waterfalls with significantly more color and detail in the water than with an ordinary, single exposure at mid-day. See my HDR shot on the right.
Here's a summer challenge for you: Take some photos of waterfalls or other moving water, and send your best results to me. I'll round up my favorite submissions and feature them in a Digital Focus in a few weeks.

- TechHive