Thursday, February 13, 2014

Settings, Techniques and Rules for New Users


A post by: Darren Rowse

Some are very basic while others go a little deeper – but all have been selected from our archives specifically for beginners and new camera owners. Enjoy.

Introductions to Useful Modes and Settings on Your Digital Camera

digital-camera-modes.jpg
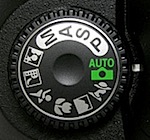
1. Digital Camera Modes Explained – I spoke with a family friend recently who had just bought a new point and shoot camera. She came up to me with her camera when no one was watching and embarrassedly asked me if I could tell her what all the little icons on the dial on top of her camera meant. This article explains what each of these most common digital camera modes means and does. Knowing them can take your shots to the next level.


2. Aperture and Shutter Priority Mode – this introduction talks you through these two very useful settings that can be found on many digital cameras. Aperture and Shutter Priority modes take you out of Automatic mode giving you more control over your images – but don’t thrust you fully into manual mode – they are great settings to explore and master.

3. Introduction to White Balance – one of the most common problems that I see in beginner photographer images are shots with incorrect color. We’ve all seen them – portraits where your subjects teeth and eyeballs (and everything else) has a yellowish tinge. Learn what causes this and how to combat it with this tutorial on White Balance.

histogram.jpg
4. Understanding Histograms – ‘histograms are scary’ – this is what one reader said to me recently when they discovered that they could view these little graphs or charts on their camera. While they might seem a little technical it is amazing how simple a histogram is to interpret. Know what you’re looking for and with just a glance you’ll know if your image is under or over exposed. It’s a useful tool to master.


5. Automatic Exposure Bracketing (AEB) – this feature is another of those often unexplored settings that many cameras have built into them that will allow you to get well exposed shots in even the trickiest of lighting situations.

Other Basic Camera Techniques

how-to-hold-a-digital-camer-2.jpg
6. How to Hold a Digital Camera – this beginner tutorial covers a topic that most camera owners skip over without realizing that it is a foundational lesson in photography. Get this wrong and it can impact the quality of your shots.

7. Shutter Release Technique – another ‘basic’ or ‘beginner’ type tip that many do intuitively – but which can drastically improve your photography if you don’t do it.


8. How to Use Focal Lock – yet another beginner technique that many of us take for granted yet which is at the core of how all digital cameras focus automatically. Get this wrong and you’ll take a lot of shots of out of focus subjects and in focus backgrounds!

9. How to Take Sharp Digital Images – ‘my shots are fuzzy’ – it’s a common problem that we’re asked about at DPS so we wrote this tutorial to refer people to to help them get the sharpest images that their camera can take.

flash.jpg
10. Shooting with an In Camera Flash – flash photography with an in built flash can lead to some terribly blown out images – here are a few tips on how to avoid them. On a similar topic – here’s 7 Strategies for Avoiding Flash Blow Out.


11. How to Get Shallow Depth of Field in Your Digital Photos – a great technique to learn if you’re into many types of photography (portraits, macro etc) is how to control the depth of field in your shots and make your main subject ‘pop’ out by making your background nicely blurred – this tutorial talks you through how to do it.

12. Understanding Exposure – this post talks new camera owners through the three main elements of Exposure. Once you’ve read it also check out our introductions to ISO, Aperture and Shutter Speed.

Camera Care and Maintenance

broken-camera.jpg
13. How to Avoid a Dirty DSLR Sensor – one of the fastest ways to ruin every single shot you take with your new DSLR is to end up with a dirty image sensor. This tutorial gives some basic tips on how to ensure it stays as clean as possible.


14. How to Clean a DSLR Lens – as much as you try to protect them – lenses tend to get a little grimy over time. This tutorial shares some basic tips on how to clean them up so that your shots will be as clear as possible.

15. 7 Digital Camera Predators and How to Keep them at Bay – this tutorial talks you through 7 of the most common ways that digital cameras get damaged – what to look out for and what preventative action to take to avoid them.

Composition Tips

200605022117.jpg
16. The Rule of Thirds – whether you know it to follow it or break it – it’s something you should at least know about.


17. Points of Interest – an image without some visual point of interest in it is unlikely to hold the eye of anyone viewing it.

18. Getting Horizons Horizontal – the perfect way to ruin that lovely sunset or landscape shot is to make it lean to one side. Get your Horizon Horizontal!

19. Fill Your Frame – this is not applicable to every shot you take but many photographers could drastically improve their photography by getting in close to their subject and filling their frame.

background.jpg
20. Getting Backgrounds Right – the background of your shot can make or break your image. This tutorial talks you through a number of things to look out for and techniques to use to get them just right.


21. Adding Randomness to Your Photos – learn how to set your images apart from everyone else’s by injecting creativity, variety and a little randomness into your shots.
Of course the above 21 Settings, Techniques and Rules for beginner camera owners just scratch the surface of all there is to learn about the art of photography. Subscribe to our blog here (via email or RSS) to get more free daily tips to help you keep improving and learning.

- Digital Photography School

Saturday, December 21, 2013

Photographing Moving Objects

Panning
Previously we’ve covered the topic of shutter speed and looked at how increasing and decreasing it can have a significant impact upon the images we take – particularly if the subjects in those images are moving.
Today I’d like to take a brief look at a related topic – that of photographing moving subjects by ‘panning’.
Panning is a technique that can produce amazing results (if you perfect it…. or get lucky) but is also one that can take a lot of practice to get right.
The basic idea behind panning as a technique is that you pan your camera along in time with the moving subject and end up getting a relatively sharp subject but a blurred background.
This gives the shot a feeling of movement and speed. It’s particularly useful in capturing any fast moving subject whether it be a racing car, running pet, cyclist etc.
I’ve found that panning seems to work best with moving subjects that are on a relatively straight trajectory which allows you to predict where they’ll be moving to. Objects that are moving side to side are challenging and can result in messy looking shots as the motion blur can be quite erratic.
Panning-2

How do you do it?

  • Select a slightly slower shutter speed than you normally would. Start with 1/30 second and then play around with slower ones. Depending upon the light and the speed of your subject you could end up using anything between 1/60 and 1/8 – although at the slower end you’ll probably end up with camera shake on top of your motion blur.
  • Position yourself in a place where your view of the subject will not be obstructed by anyone or anything else. Also consider the background of your shot. While it will be blurred if there are distracting shapes or colors it could prove to be distracting. Single coloured or plain backgrounds tend to work best.
  • As the subject approaches track it smoothly with your camera. For extra support of your camera if you’re using a longer lens or are feeling a little jittery you might like to use a monopod or tripod with a swivelling head.
  • For best results you’ll probably find that setting yourself up so that you’re parallel to the path of your object (this will help with focussing).
  • If you have a camera with automatic focus tracking you can let the camera do the focussing for you by half pressing the shutter button (depending upon it’s speed and whether it can keep up with the subject)
  • Panning-1
  • If your camera doesn’t have fast enough auto focussing you’ll need to pre-focus your camera upon the spot that you’ll end up releasing the shutter.
  • Once you’ve released the shutter (do it as gently as possible to reduce camera shake) continue to pan with the subject, even after you’ve heard the shot is complete. This smooth follow through will ensure the motion blur is smooth from start to finish in your shot.
  • If you have an older digital camera or one that is of a more entry level point and shoot variety you could also have to contend with the dreaded ‘shutter lag’ problem. Shutter lag is when there is a slight delay from when you press the shutter to when the picture is actually taken. If you experience shutter lag you’ll need to learn to anticipate the moment to take the shot and will definitely need to continue to pan well after you’ve taken the shot.

A variation on the Panning Technique

There are no rules with panning and you might also like to experiment with using your flash while panning. This slow synch flash technique will only work if the subject is close enough or your flash is powerful enough to have an impact – but will help to further freeze your main subject while giving the background the motion blur you’re after.
If you do use a flash you’ll want to test a variety of settings to get it looking right. In some cases you’ll probably need to pull back the strength of your flash by a half or a third.

Panning and Patience

Panning-3
If you’re going to try panning for the first time you should approach it with an experimental attitude. It can be a lot of fun but can also be quite frustrating. If you’re at a special event where you have fast moving subjects (like a car race etc) you’ll probably want to mix up your style of shooting. Don’t just use this technique all day – instead also shoot some shots at fast shutter speeds. This way you’ll end up with a variety of shots and will probably end up with some useful ones instead of just having a collection of blurry unusable ones.
If you want to practice panning (and it is something that you need to practice – a lot), head out into a busy part of your city and practice on passing traffic. That way you have a never ending supply of subjects.
Also keep in mind that it’s unlikely that your main subject will ever be completely sharp and in focus. This technique is about getting a relatively sharp subject in comparison to it’s background. Some blurring of your main subject can actually add to the feeling of motion in the shot.
Once you’ve practiced the panning technique share your results with us in our Forums.
Note: this post is a ‘classic dPS post’ that was previously published but has been updated for today. Also read about the technique of panning in The Art of Panning.

Wednesday, December 11, 2013

Stock photography tips: how to shoot and edit stock photos that sell


Tired of your stock photography endeavours going to waste? Start making some money from your photography; use these stock photography tips to start setting up your shoots and editing photos in a more commercially minded way.
Stock photography tips: how to shoot and edit stock photos that sell
Stock photography went through a revolution as the microstock market established itself using the internet as a platform, and today there are a huge number of sites through which you can make a little extra income from your hobby.
However, the bottom line still remains – stock photography needs to contain a strong commercial subject and concept, while being useful to designers. It’s unlikely you’ll make much of a success from pictures of your kids, pets or garden flowers because these areas have been comprehensively covered.
Likewise, applying multi-filtered effects or creative crops will have a negative effect on your sales because buyers will find limited potential when put in context with their specific projects.
Our original shot
Our original shot
The path to success is simple – plan and arrange a strong concept shoot, compose your images with plenty of room for potential titles and/or copy, and edit your Raw files in a sympathetic manner that enhances the photo while minimising any further effects of compression artifacting.
Shooting in a Raw format is generally advisable because this allows some flexibility when running your initial processing.
Bundled along with Photoshop, Adobe Camera Raw provides some basic editing tools that can often provide the fundamentals needed to get your images virtually up to standard, assuming your photography skills are reasonably strong. Try to avoid burning out highlights or blacking out the shadows because these can never be salvaged.
Although it’s basic, Camera Raw provides some effective tools that are all too often overlooked because many consider the tool to be a simple Raw conversion tool.
Take some time to understand at least the most basic contrast and colour correction tools because processing at this stage substantially reduces the amount of artifacting introduced in the later Photoshop processing stage.
Once you have your images in Photoshop, keep all of your edits as basic as possible so as to simply enhance the original photograph.
Remember that your image will be an asset within a bigger design, most commonly for online or print use, and designers putting together such material may want to further edit them to match a house style.
If you impose a texture or make generous use of post-processed effects such as cross-processing, then these edits may make your image unusable to many potential buyers.
One of the most important elements to consider is an image’s contrast, so use Levels to set your black and white points. Colour temperature or white balance adjustment is much simplified using a simple slider in Camera Raw.
Some diligent use of the Spot Healing tools is good for removing any sensor spots or unnoticed logos, and finally, some simple straightening or compositional cropping might be beneficial.
Once you’re happy with your edits, save your file first as an uncompressed TIFF, should subsequent work be necessary (following a rejection for an overlooked logo, for example) and finally as a JPEG at the highest setting possible, making sure not to upsample because this only degrades quality unnecessarily.

How to edit stock photos that sell

How to edit stock photos that sell: step 1
01 Camera Raw adjustments
Study and master the controls within Camera Raw and you’ll find the majority of your processing can be done before you fine-tune things in Photoshop.

How to edit stock photos that sell: step 2
02 Photoshop edits
With Camera Raw taking care of the essentials, you can polish things up in Photoshop with the Healing Brush tool and Blend Modes, or you could apply advanced colour retouching.

How to edit stock photos that sell: step 3
03 Saving your file
Always use the highest settings when saving your final image. Set image compression to None for TIFFs and put the slider all the way up to 12 for JPEGs.
Final Tip
Many stock sites import EXIF data, so save time by embedding pertinent keywords in Adobe Bridge.

- Digital Camera World

Tuesday, December 10, 2013

Best camera settings for taking pictures at twilight


Do you struggle with colour rendition and sharpness when shooting in low light? In this quick guide we run through some of the best camera settings for taking pictures at twilight.
Best camera settings for taking pictures at twilight
The upside of the later sunrise and earlier sunset at this time of year is that you can set about getting dramatic twilight shots.
It’s usually best to shoot fairly soon before sunrise or after sunset, when the sun isn’t too far below the horizon.
At these times, clear skies take on a deep blue colour, and reflect fabulous light down onto the scene. Long exposures work well for static subjects.

Use a tripod and keep your camera’s sensitivity to a low value of around ISO 100 to 200. This will optimise picture quality, keeping image noise to a minimum.
Watery surfaces, which are often good to include for reflecting city lights, take on a smooth and mirror-like sheen.
However, if you’re including a river or lake with boats bobbing about on a choppy surface, you’ll need a faster shutter speed to avoid motion blur, so increase your ISO setting accordingly.
This will also be necessary to avoid camera-shake if you’re relying on handheld shooting.
A neat trick is to select the tungsten or incandescent white balance setting in preference to auto white balance.
You should get a much more natural colour rendition for artificially lit areas of the shot, while emphasising the deep blue of the twilight sky.

- Digital Camera World

Capturing Cityscapes At Night

Night photography is great. And the results can be outstanding. So why are digital photographers often disappointed?

Be disappointed no longer! Follow the tips here, get some practice in, and start producing some night time city photography to be proud of!
The tips here will require some equipment. None of it is that special, or that expensive though.

And you probably already own the most important piece of equipment - a camera.
If you haven't already done so, have a look at the night photography equipment page. (opens in new window)
Next to a camera, the most important thing you will need is some tips - and you'll find those below.
SAFETY NOTE: Be aware that some places are less safe than others after dark. Take sensible precautions. Keep your camera hidden as far as possible, and maybe take a friend along too.


Night Photography techniques - the set up

When taking night time photos of cities, there are a couple of planning tips you will need to bear in mind before you take any photos:
First, you need a good viewpoint;

And second, you need either a tripod or a solid base to place your camera on.

And third (well, I guess this is optional!), a photography 'trick book' - with some fancy techniques that can really take night photography to a whole new level.Back to those first two essentials - the viewpoint - this depends a little on the type of shot you are after. My preference is for somewhere that is above the ground (a set of steps, for example), but not always. Sometimes the best shots can be had at ground level.
You need a tripod or solid base because your camera's shutter will be open for several seconds, and you need to make sure the camera doesn't move during those seconds.
Then, if you have a tripod, secure your camera upon it. If you don't, find a solid surface to rest your camera on; propping it up with something like a bag or jumper.
Once your camera is in place, make sure your shutter speed is set to a good few seconds. Start with about 15 seconds.
If you can't control your camera's shutter speed, set it to "night" mode.
Click here to read more about what shutter speed is, using shutter speed creatively and creative photography tips for stunning images.

Night photography - taking the photo

macau casino at nightOnce you are set up (camera on a solid surface, self timer primed), you are ready to shoot.
First, check your scene. Is everything in it that you wanted to be in it? If you are aiming to get streaking car headlights, is there any traffic around?
Once you are happy with things, press the shutter button.
Your self timer will count down. Special Note! - If you are waiting for something to appear in your scene, you will need to remember that your self timer will have to count down first - plan some time for this.
When the shutter clicks, wait. And wait, and wait . . . until it closes again. Remember that this will be a few seconds.
Then wait some more. Because of the long exposure digital cameras take longer than usual to process the photo, so your preview on your camera's LCD screen may take a while to show up.

If you're 'painting with light' (and why not add a little twist to your night photography?) you can tell your assistant their job is done. Never heard of painting with light? Everything you need to know is in this downloadable ebook.

Night photography - what makes a good shot?

This is just my opinion, but here are a couple of things that I think make a good night photography shot:
  • Neon lights
  • Streaks of car headlights and tail lights
  • Available light
For both of these you need to plan a little in advance. Find an area where you can safely photograph neon lights.
Find your solid spot (or put your camera onto a tripod), and then take a few shots. Because neon lights flash you will need the shutter to be open for some time in order to catch all the flashes.
Kuala Lumpur, Malaysia, at night. Showing streaks of car tail lights.And for streaks of car headlights and tail lights - find a spot with a lot of traffic.
Try to get something in the background too - streaks of light on their own can be a little boring!
Then take your shot.
The longer the shutter is open, the more streaks you will capture. And of course, the more traffic there is, the more streaks will appear too!
The available light also has a part to play in making a good night photography shot.
Sometimes a scene looks its best when set amongst inky-black skies. Sometimes, a little light works best, so shots just before dark really sets in are worth a try too.

And some scenes look just great when you inject a little photography magic into them. There are plenty of creative ideas here.
Try both, and see what captures the effect you are after best.

Night photography - final tip

My final tip is very simply this - practice!
You will find that sometimes a 10 second exposure gets the look you are after. Sometimes you may need up to a minute.
Practice, and you will soon get a feel for what you will need for any given situation.

- Digital Photography Tips

Settings For Night Photography


Nothing spoils your night photos like soft subjects and odd colour casts. Below and on the following pages we’ll introduce some of the key night photography settings you should use in order to get pictures with real impact. We’ll not only show you how to set up your camera for night photography, but offer night photography tips for controlling your colours, planning yours shoots and more.
Night photography settings your camera wants you to use
Stepping out into the night and shooting the darkening sky can be one of the most exhilarating ways of expanding your photographic repertoire.
You can reveal a whole new world by shooting night photography, and end up with some much more satisfying images than the usual rather predictable stuff taken at sunrise or sunset.
The really good news is that it’s not all about high-end camera kit. Modern DSLRs are highly capable, even at the beginner end of the market. Nor does your set-up have to include an array of exotic prime lenses, since any lens and digital camera can have you reaching for the starry heavens far more easily than before.
Night photography isn’t all about shooting into a black viewfinder and guessing at compositions. For a simpler start, use the full moon to illuminate the landscape.
Night photography settings: use available moonlight to illuminate your scene
Use moonlight to illuminate your scene
Moonlight is a neutral, white light that almost looks like a massive flashgun has lit up the land. Start by picking a favourite and well-known location that’s within easy reach of the car.
Put the camera on a tripod, choose the manual mode to give you more control over your night photography settings, and then select a wide aperture (f/4, for instance).
You’ll also want to include a high ISO value (such as ISO 800) and a shutter speed of about 30secs among your night photography settings (find out how to reduce noise at high ISO settings). Fire off the shutter using a cable release and marvel at just how much unseen detail your camera has recorded.
Night photography settings: use a high ISO to accentuate a starry sky
Use a high ISO to accentuate a starry sky
If you’re looking for a truly cosmic photo, capture the dark night sky instead. The light levels will be a lot lower than moonlight, but you can compensate for this by using a higher ISO setting.
Choose ISO 3200. This will record thousands of stars, but don’t expect the camera to pick up any details in the landscape, such as a moonlit hilltop.
Night photography is all about letting go of image conventions. The light is so greatly reduced that the pictures will consist of photographic taboos, such as featureless shadows, but don’t let this inhibit you.
When you begin processing your night photos on a computer, don’t be afraid of using noise-reduction software. Most raw converters, such as Adobe Camera Raw, do an admirable job of bringing down noise levels. The Luminance slider provides the best control of noise reduction without decreasing detail.
Try applying the noise reduction in two stages: once in raw and then again using Photoshop CS’s Noise Reduction tool, which enables you to tackle the issue in separate colour channels using the advanced options. You’ll often find that one colour channel 
in particular will contain most of the noise.
If your noise-reduction efforts in Photoshop prove to be unsuccessful, try taking a ‘dark frame’ during your next shoot and subtracting it from the subsequent pictures.
Open your dark-frame image and the night photo you want to process in Photoshop. Copy and paste the dark frame into a new layer on top of the image and select the Difference blending mode (learn more about blending modes and the 10 best blends for photographers).
Your first shoots may not be successful, but once you gain some knowledge of how and where to shoot, night photography becomes an extremely enriching experience. With good camera technique and careful processing skills, your images can be breathtaking.


3 key night photography settings every photographer should use


Night photography settings every photographer should use: shoot wide
Shoot wide
Keep the aperture setting as 
wide as possible. If you don’t have a fast prime lens (such as 24mm or 35mm f/1.4) then f/4 is a good compromise. Make sure you test your lens in the daytime to see how sharply it performs with the aperture wide open.

Night photography settings every photographer should use: boost the ISO
Boost the ISO
Make the camera sensitive to 
low light by selecting a much higher ISO than normal. If you’re shooting in moonlight, the value doesn’t need to be any greater than ISO 1600, but choose ISO 3200 for dark, starry skies with little illumination.

Night photography settings every photographer should use: customise your shutter speed
Customise shutter speed
Make sure the shutter speed is 
no longer than 30 secs. If it is, 
star trails will start to form and the stars will lose their definition. Make use of your DSLR’s self timer or a cable release to ensure that your hands are off the camera when the shutter fires.


Control your colours


Fine tune your white balance for better hues
With your camera set to automatic white balance, night photos will tend to look rather blue.
Night photography settings: control your colours
Auto White Balance
This is because, even though our eyes are only seeing a world in monochrome, the camera is still being presented with a blue sky.
By shooting raw files, it’s possible to fix this problem at the processing stage. Simply choose a warmer white balance – somewhere around 5000K should suffice – and the picture should better resemble how you saw the night scene.
Night photography settings: control your colours with warmer white balance settings
Warmer White Balance
Make sure your white balance isn’t pushed up too far though. If it is, the ground will start to look unpleasantly yellow or brown, which can end up being worse than an overly blue image


Final tips for your night photography shoot


Night Photography: capturing motion blur
Plan your shoot
If you live in a town or city, it’s best to get as far away from street lighting as you can. If you don’t, you’ll find that sodium lights create a strong and disagreeable orange colour cast. For the best results, choose night scenes as far from urban areas as possible.
Prefocus

Switch off autofocus and make sure the camera is focused at infinity. The slightest error will create soft-focused images. After you’ve taken the first shot, check that your focusing is correct by reviewing the picture on the camera’s LCD.
Find a solid base
Make sure your tripod is mounted on a solid base, preferably a rock surface. 
This will prevent any movement during the exposure times. If you don’t have a heavy tripod, hang your camera bag from the centre column (most modern tripods should have a hook for this purpose).
Disable in-camera noise reduction
In-camera noise reduction takes a blank exposure, which doubles your exposure times and applies indiscriminate noise reduction. This can have a detrimental effect on image aesthetics. Use specialised computer software to handle the problem back home.

- Digital Camera World


Shooting Moving Water Photograph


Rivers, waterfalls and gently babbling streams are soothing even in photographs. 
We are automatically drawn to the contrast of blue and white waters passing through brilliant green landscapes, gentle fields of yellowing grass, or tumbling through grey and green moss covered boulders and rocks. 
How do you capture water in motion?
waterfall
Beginners Photography - Photorealistic Images:

If you permit the automatic settings in your camera to record the moving water, chances are it will opt to utilize a fast shutter speed to eliminate blur.

While this gives an accurate depiction of the moving water, it may not create the tone or texture that is desired.


Beginners Photography - Smooth Water:

By adjusting camera settings manually the appearance of moving water can be made smooth and almost “soft”. This is done by choosing a slow shutter speed.

This may require reliance on a tripod to prevent hand shake and blurriness, but the result will be dramatically different than from an automatic settings. The slower the speed of the shutter the blurrier the passing water becomes giving it the softer and opaque appearance.


Beginners Photography - Basic Shutter Speeds :

For blurry water it is best to begin with one eighth second setting and work down from there, but true smooth water usually is not available until a shutter is open for a full second or more. Also the lower the ISO on the shot the more likely the image captured is going to be satisfactory.

This is where the smallest aperture and highest f/stop will result in the slowest possible shutter speed for the ISO and lighting conditions.


Beginners Photography - Remember Distance:

The distance between the camera and the image of water it is capturing changes the effect of shutter speed on the "blur" factor. The closer the camera is to the water the more quickly the blur is captured.

Low lighting may exist within many moving water environments and this too will necessitate slower shutter speeds and even tripods.


Beginners Photography - Rely on Shutter Priority settings:

experiment with a few shutter speed settings for moving water, and allow the shutter priority to determine the f-stop and aperture on the image.

Record which results you find the most appealing and visit other bodies of moving water to further experiment.


Beginners Photography - Don’t Limit Subjects:

remember that water flows to the sea shore in large waves and gentle lapping tides, it flows from lawn sprinklers and regularly spurts and erupts from public fountains, so experiment at many types of locations.

waterfall
Moving bodies of water never present the same image capture requirement which is why photographing moving water can be such a fun and highly experimental venture.

Many photographers return to the same locations throughout the year to record the variations in plant life, water levels and to learn about photographing in the changing light and seasons.